

If you are a Dynamics 365 CRM user, you can effortlessly create global events and share the joining link with your users. Thanks to the Dynamics 365 Calendar plugin!
Using this simple yet multi-functional calendar plugin for Dynamics CRM will not keep you dependent on tools with limited features and pricey subscriptions. Many businesses use Calendly and other free online scheduling tools to share links to events or appointment bookings with their customers.
But do you know they get to do this at what cost? Well, let’s find that out in this blog.
Let’s also explore how you can create and share a global event that’s open to everyone across different time zones, including your CRM and non-CRM users.
How Is the Calendar 365 Plugin Different and Better Than Calendly and Other Similar Tools?
If you are a Dynamics 365 CRM user, you must already know how painful it is to schedule and manage global events.
But if you have the Dynamics 365 Calendar plugin, you don’t have to worry about juggling different calendars or scheduling software.
And here’s why:
It isn’t expensive
Calendly’s CRM integrations are available for $10 per seat/month. The costs are even higher for teams and enterprise plans ($15K/year! 🤯). These prices are super costly for small businesses that want to leverage features like event booking, online scheduling, managing resource availability, etc.
Fully customizable
Unlike other online appointment booking tools, Dynamics 365 Calendar offers 100% customization. You can change the calendar’s look to match your branding. Whereas, other calendar plugins or extensions give you limited customization liberty, such as changing just the logo!
Well, the option to change just the logo or the name is not sufficient for all businesses. You may need to provide a personalized appointment booking experience to the customers or partners.
Direct integration with Dynamics CRM
Although Calendly provides integration with Dynamics CRM, it requires Zapier, a third-party extension. The intervention of an additional extension increases complexity and also leads to additional costs.
However, the Dynamics 365 Calendar can be directly integrated with your existing Dynamics CRM. Therefore, ensuring no additional charges or configuration hassles.
Real-time updates
Dynamics 365 Calendar seamlessly integrates with the CRM, providing real-time updates of global, round-robin events and other appointments. In short, all rescheduled or canceled meetings will be automatically updated in your CRM, thus eliminating any data inconsistencies.
Additionally, it will reduce your manual data entry work!
Project management
With Calendly, you have to accept the limitations of project management. However, the Dynamics 365 Calendar gives you the ease of managing multiple projects and resources, along with creating and sharing global events.
Additionally, Calendar 365 for Dynamics CRM helps you visualize the activities on a timeline and track productivity, which Calendly does not!
How to Create Global Events and Share the Link?
Suppose you want to create a global event on Calendar 365 inviting people to book their appointments for a free 1:1 business consultation as a part of sales activity.
Let’s understand how to create this event in the Dynamics 365 Calendar and share the booking link with your potential clients across different platforms.
1. Create Global Event
The first step is to create a global event on the calendar. For this, you need to go to Configurations and select Event Types.
Click on the Global Events tab and add an event.

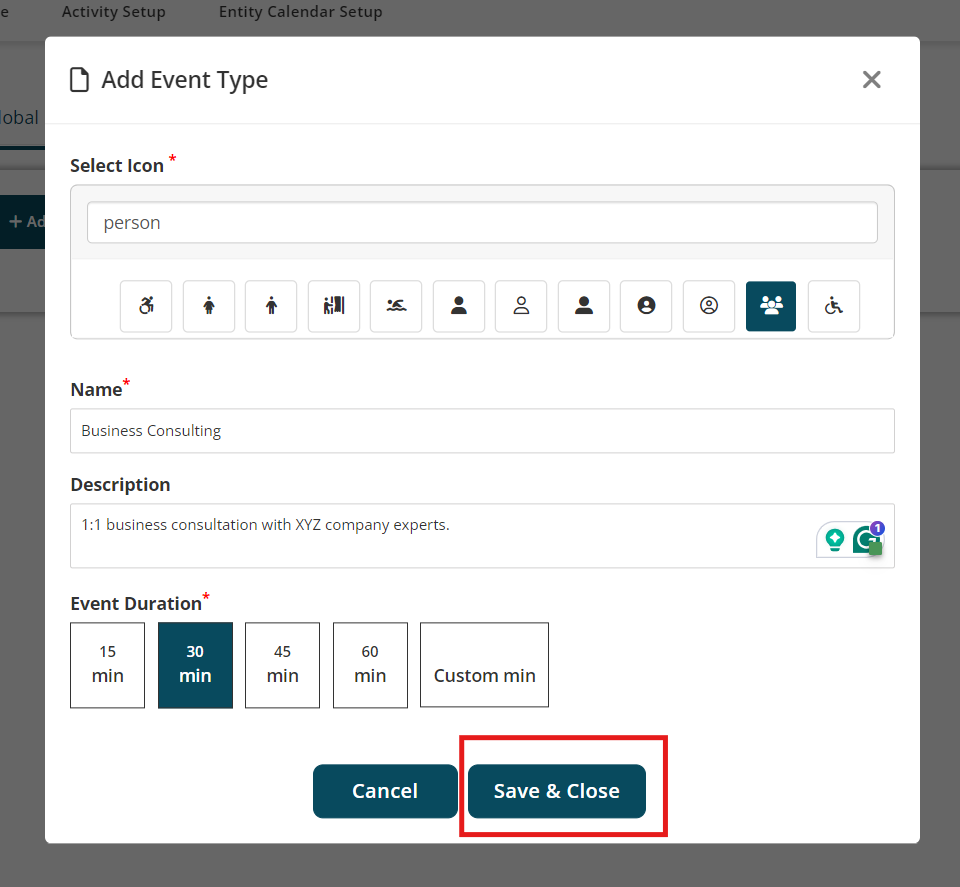
Once you create the event, a dialogue box pops up wherein you need to choose the event icon and fill in the details, such as:
- Name of the event
- Short description
- Meeting duration
After adding all the required details, save the changes by clicking Save & Close.
2. Ensure that the Global Event is ‘Activated’
After saving the event details, you will be redirected to the main events page, where you can view the created global event.
Also, ensure that the toggle is turned ON so that the event shows up on the final booking page!
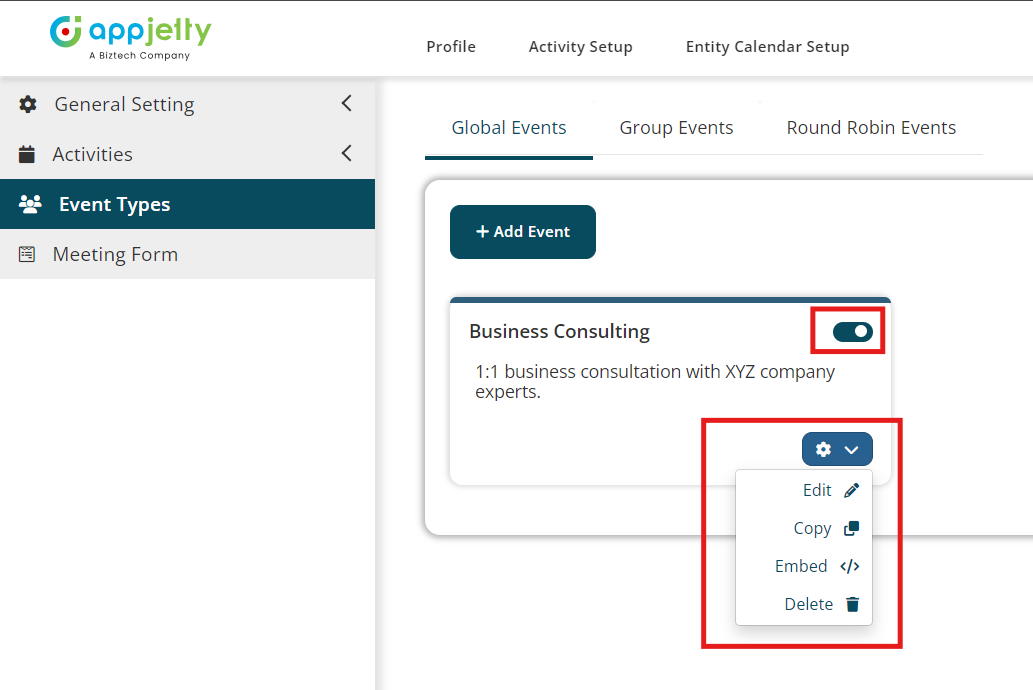
On the same event card, you will be able to access multiple settings, such as editing, copying embedded code (HTML), and deleting the event.
3. Share the meeting link
You can now share your unique booking link on multiple platforms where you think you can get the most traffic. All you have to do is copy the booking link page’s URL and add it to the places you want to share it.

For instance, here are a few major places where you can add the appointment booking link:
Your website:
- Homepage
- Contact page
- Service pages
- Header and footer
- Pop-ups and banners
Social media handles:
- Profile bios
- Posts and stories
Email:
- Email Signature
- Newsletter
- Other automated emails
Online listings sites:
- Google My Business
- Review sites like Yelp
Messaging platforms:
- Automated chatbots
- SMS campaigns
Different contents:
- Blog posts
- Webinars and online events
Referral network platforms:
- Partner websites
Others:
- Industry-specific directories
- QR on printed materials
- In-store displays
Now that you know how to create the event and share the link to your appointment booking page, let’s see how your clients can book a meeting using it in 5 steps.
How Can Clients Use the Appointment Booking Link to Schedule Meetings?
Here’s how your potential clients can book an appointment using the link you shared.
1. Select the date
If your client has been redirected to the booking link page using a particular unique link, they will see this window with the name of their POC (point of contact). For example, you can see John William (POC) on the left side of the screen in this case.
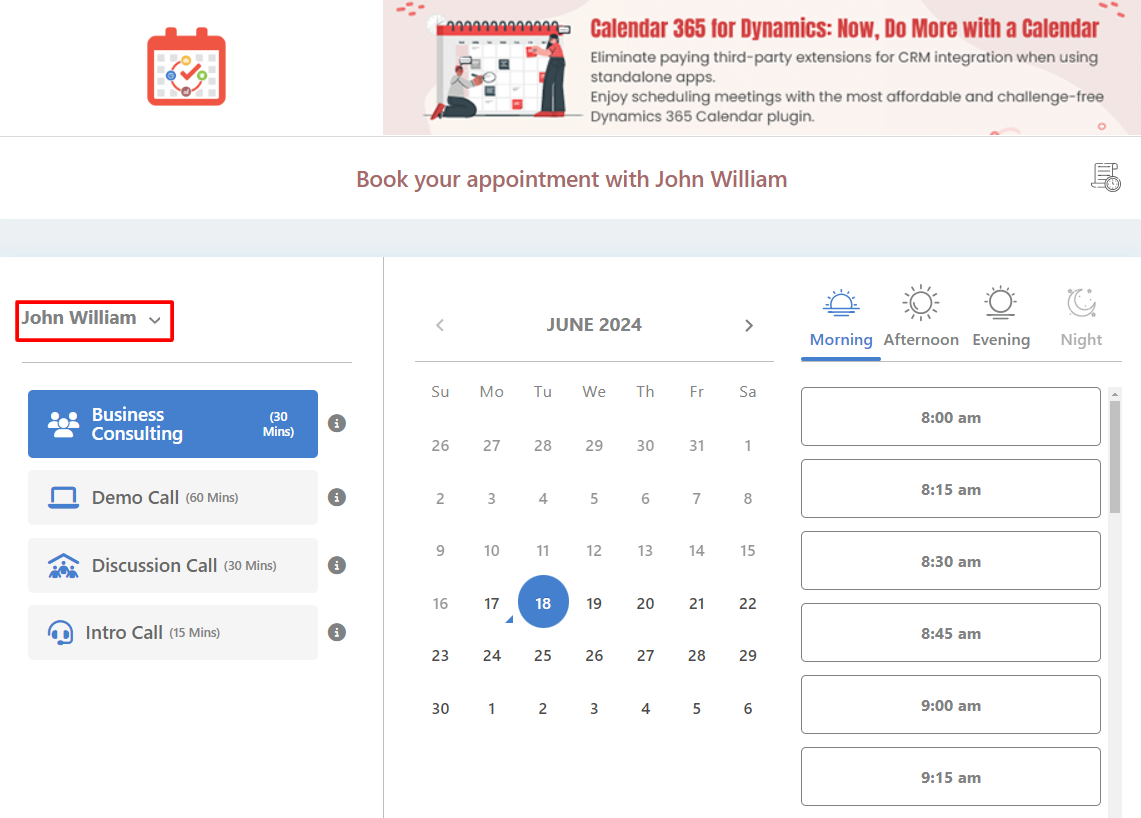
Now, page visitors can select the appointment date from the calendar and browse the available time slots by clicking on the tabs—morning, afternoon, evening, and night.
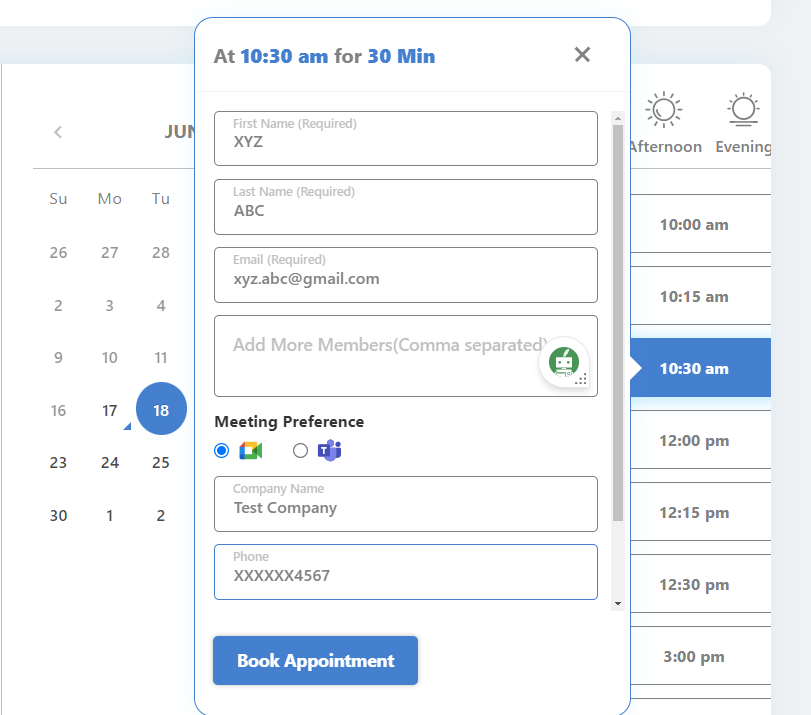
2. Select slots and fill in the details
Once the client selects the slot for booking the 1:1 consultation, they will have to fill in the following details:
- Name
- Contact number
- Company name
- Preferred meeting platform (Google Meet or Microsoft Teams)
3. Book the appointment
After the client enters the details and taps on Book an Appointment, they will receive a system-generated email.
For instance, if they book the appointment through their Gmail ID, they will receive the meeting invitation from Google Meet. Additionally, they will get an email from Dynamics CRM that includes all the necessary meeting details.
On the other hand, if the client selects Microsoft Teams as their preference, they will accordingly receive the email and the meeting reminders.
4. Cancel/Reschedule/Book new appointments
Once the appointment has been confirmed, this is what the clients will see next.
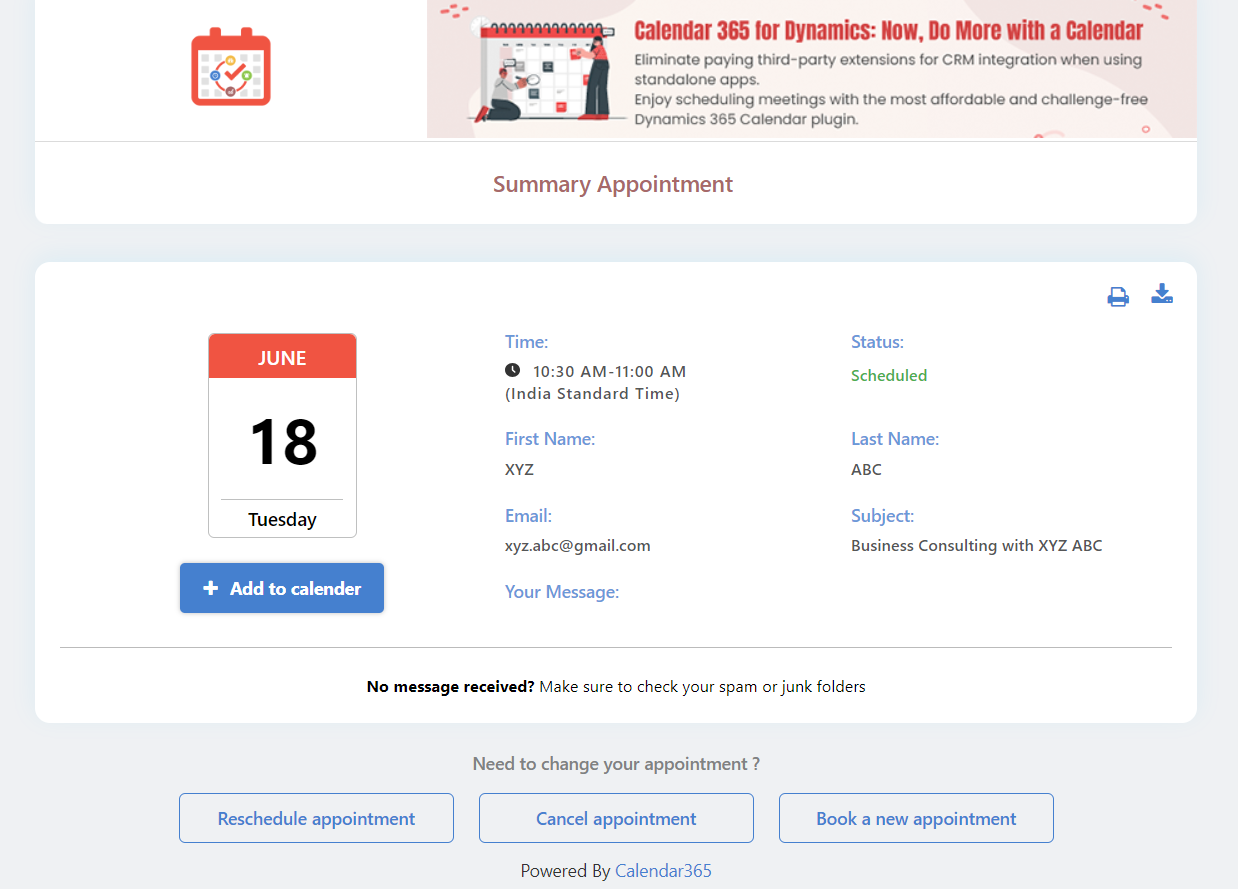
On this page, they can click the Add to Calendar tab to add this meeting to their Google Calendar. Furthermore, they can reschedule and cancel the appointment if they want to.
Also, the clients booking the meetings also get the option to book a new appointment.
5. Get reminders
As per standard, Google or Microsoft Teams will send meeting reminders to the client so they can join the one-on-one consultation meeting on time.
Interesting Things You Can Do With Dynamics 365 Calendar
Besides creating global events on the Dynamics 365 Calendar, you can also do the following things.
Visualize resource schedule
You can color-code resource schedules. It will help you identify the activities without referring to the list of activities. For example, you can set break times as blue, pending activities in yellow, leaves in red, etc.
Share appointment activities
When creating appointments, you can also share them with other team members. You can enter the names in the required and option fields while setting an appointment. Additionally, you can look up the records in your CRM to add them to required and optional fields.
Generate workload report
You can generate an activity summary or workload report from the Calendar 365 navigation panel. Furthermore, you can set filters such as from and to date, activity status, and user/team to generate the report.
Edit and update calendar views
As the Dynamics 365 Calendar admin, you can edit and update different calendar views as you like. Under the same setting, you can even change the view name and share it with other CRM users or teams.
Summing Up
When planning a global event, it can get quite frustrating to manage the appointments and share their details with everyone. However, the Dynamics 365 Calendar makes it less troublesome and more enjoyable.
With this smart calendar for Dynamics 365, you can competently use your time without worrying about creating, sharing, and managing events. Furthermore, you can send your unique appointment booking links to invitees faster and more effectively.
In short, this powerful online appointment tool eliminates the hassles of scheduling meetings, so you can focus on the other important elements of your event.
Put simply, Calendar 365 is the best plugin for eliminating all the back-and-forth of scheduling with a global-level clientele.
All product and company names are trademarks™, registered® or copyright© trademarks of their respective holders. Use of them does not imply any affiliation with or endorsement by them.


